3 Skills to Master Before Starting Your Jump Training

Are you ready to take flight?
Before starting a new jump training program, it’s important to master some basic movements that are involved in jumping: properly landing, jumping, and jumping repeatedly. You might be thinking that you already do them well, maybe you do, but there are plenty of athletes that don’t know how to do those skills correctly.
1. LANDING
Body Position
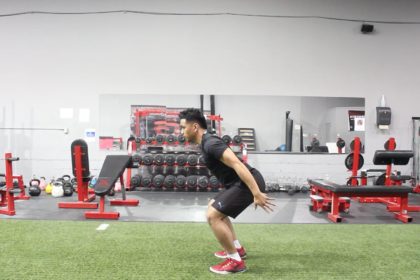
A good landing starts with good body position. A landing position is similar to an athletic position.
- The head is neutral in relation to the spine
- The feet should be hip to shoulder width apart
- The knees are not caved in
- The ankles and knees are bent, and hips are back
- The torso is stiff to keep the spine neutral


If an athlete is having trouble bending and hinging at the knees and hips, you must first teach them how to perform those movements (i.e. Squat and Straight-Leg Deadlift). Once, they’ve mastered those movements, an easy way to practice landing is doing a drill called Snapdown.
This is one of my favourite drill to teach athletes how to land and maintain stiffness. Here’s a video on how to do a Snapdown. There are two variations that I teach, the double-leg and single-leg (advanced exercise).
I usually prescribe the Snapdown as part of the warmup right before any jumping happens. It helps the athlete reinforce and maintain good body position and joint alignment before jumping. Also, its used for neural activation or exciting the nervous system prior to their jump training.
2. JUMPING
Now that you’ve mastered the Snapdown, it’s time to jump. The start position of the jump is very similar to your landing position. The only difference is that when you land, your body is slightly forward and your weight is more on the forefront of your foot.
Start Position
- It is the same as above


Take-off
- Keep your eyes on the landing target
- Swipe your arms up
- Aggressively extend ankles, knees, and hips

One of the best way to practice your jump technique is performing a box-jump (start with knee height). Follow the take-off tips above as you jump on top of the box. Do 3-5 reps and try to soften your landing every reps. Step back down rather than jump down from the box.
How high should you go?
The higher the box doesn’t always equate to the exercise being better. It may look good to jump on a box that is the same height as you but the risk of injury isn’t worth the trade-off as an athlete. Landing a jump on a taller box doesn’t mean that your vertical is the same height, it just means that you’re flexible enough to bring your feet above your hips.
Like I mentioned above, start with a box that is knee height. Once you get better at jumping and landing on a box, you can move up to a higher box. But, the landing position should look similar to your start position and the softer the landing, the better. Gradually increase difficulty instead of taking big leaps and to decrease the risk of hurting yourself.
3. JUMPING REPEATEDLY
Now it’s time to put it all together. It can get difficult to keep proper technique when jumping repeatedly because you have to absorb the force and take off quickly. Once you mastered both number 1 and 2, this third step should be natural.
- Snapdown to setup a good start position
- Jump high and swipe your arms up for added momentum
- Land in a stable athletic position
- Immediately jump up again
To practice your repeated jumps, start with doing two then progress to three and four. When you confidently mastered all three skills, you are now ready start your jump training program and take flight.
If you like what you read, share it and leave a comment below! You can also sign up for my newsletter to receive more training tips straight to your inbox!


